

Christmas is almost here, and with all of the hustle and bustle going on around us, sometimes it’s hard to take even a moment to ourselves to regroup and push forward. I am one of those people that absolutely loves almost everything about Christmas, but there still are times when the pressures of the season are looming and things feel as if they will never get done. They usually do, but still, it’s a lot. I’m sending out a virtual hug to anyone that needs it right now AND want to thank you for taking time out of your day to read this at all. Time is so valuable and I hope you find this little post helpful in breaking up your day!!!
“It’s the most wonderful time of the yearrrrr!” So, I just need to get this off my chest…Am I the only one who hears this song (which is a LOT this time of year) and immediately thinks of this Will Ferrell SNL skit? I still laugh over it. Ahhhh. It escalates quickly. haha
Okay, onward to the makeup look I have for you guys today!! Although, I do want to say a few things before we dive in. This makeup look is one that I have done only twice before, and I just want to say that I would not recommend doing this one if you are very rushed for time. The first time I did it I was playing around and a little unsure of the layers so it took me, what felt like, forever. The second time around was much quicker and I wasn’t so worried about screwing it up. I’m sure the next time I’ll be even faster yet! But I feel like it’s a good reminder to be patient with yourself if you try this out and haven’t done it before. Also remember, it’s just makeup and can easily wash off!!! No harm, no foul 🙂
Secondly, I thought it should be noted that the major players in this makeup look (the gold liner, the black liquid liner, and the red lipstick) are all of the cheaper side of makeup things!! They are all under $10 and so affordable. Not everything I use is affordable in this particular look, but know that there are always similar options out there that you can find that will work well too!! I usually just say the color I use in my tutorials so that hopefully anyone can find something similar in any price range!

Thirdly, I have to just mention that I saved my FAVORITE color combination for this makeup look. Red and gold have a very special place in my heart, and actually were the colors that I picked for my wedding! Also, when I picture attending a fancy holiday party, I see myself sipping on gold champagne and being surrounded by berry red holly decor. It just goes so well together. I think it’s a gorgeous combination and hope that you’ll love it as well!!! So, without further interruption, here is my Gold and Red Glam Holiday Party Makeup Look!
STEP BY STEP:
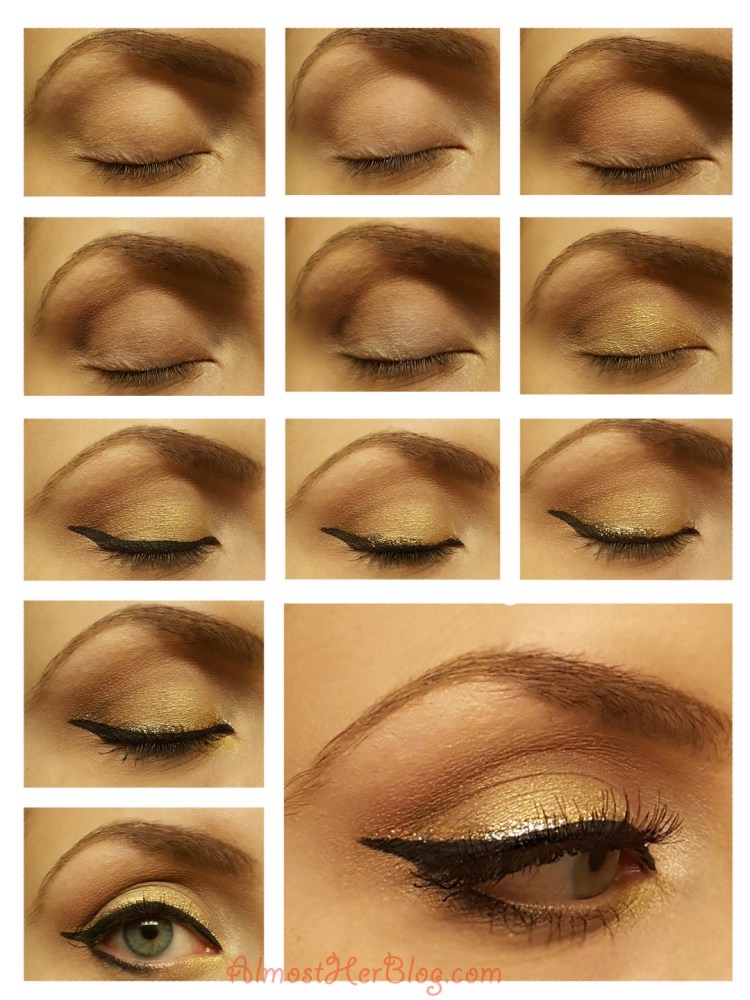
- I always start my makeup looks the same way for optimal blendability and sustainability: I apply Urban Decay’s Primer Potion to my eyelid and wait a minute before setting the primer with a very light beige matte eyeshadow all over. This time I got the Anti-Aging primer. I am turning 30 in a few months, you know. ha!
- I then took “Combust” (which is a taupe pink color) on a fluffy brush and did a windshield wiper motion in my crease and up, buff this one out so there are no hard lines. This will be your transition shade.
- I then took a coppery bronze shade with a fluffy brush and blended that right along my crease line to darken it up, and act as more of a progression to the next darker shade. Lightly buff it out, but don’t bring it past your first color.
- On a small tapered brush, I took black (I used black with gold glitter) and laid it right along the outer edge of your crease. I made very tiny buffing motions to keep it concentrated in that area, but I also got rid of any harsh lines. It doesn’t have to look perfect. I then took my bronze color on a fluffy brush and smoked it out a little to prevent the harsh lines.
- Then I used a tiny bit of a white cream base (I used a white eye pencil) on the center of my lid. This will help the next color pop a little and stick.
- I then took a metallic yellow-gold color and popped it all over the lid and over the white area. This just gives your eye a little more dimension.
- Liquid liner time!! This look does work best with a nice sized winged liner, which I suggest using liquid liner or a brush. Regular pencil liner makes this very difficult to get the end of the wing precise, so liquid it is! I made a dark line and brought the tip of the liner up and out. TIP: If you haven’t done too many winged liners before, a great way to start is to either use a flat edge or a piece of tape to guide the liquid liner. Place the flat surface along the curve of the bottom lash line and up toward the edge of the end of your eyebrow. It will almost look like you drew a line from your bottom lash line up to your eyebrow. Then fill it in slowly backwards toward your original liner. Also, practice helps this!
- I waited a second for the black liner to set a little, and then I took my crystal liquid liner and traced just above the black liner.
- Let it set again. Have a sip of wine, and continue. I then went over the crystal liner again to really make the gold really pop!
- To clean up all of the edges I took my black liquid liner again and went over the area that I started with. This will help the lines look crisp and not all over the place.
- For my bottom lash line I started by adding a little of the yellow-gold eyeshadow to the inner corner with a small angled brush.
- I then took the black color on an angled liner brush and brought that from the outer edge of my eye to the halfway point. Then I buffed it out using a smaller brush dipped in the taupe color.
- I finished the bottom lash line by adding yellow/gold eyeliner to the water line.
- I used one coat of mascara before popping on my fake lashes and BAM! You are done with your pretty eye look!!
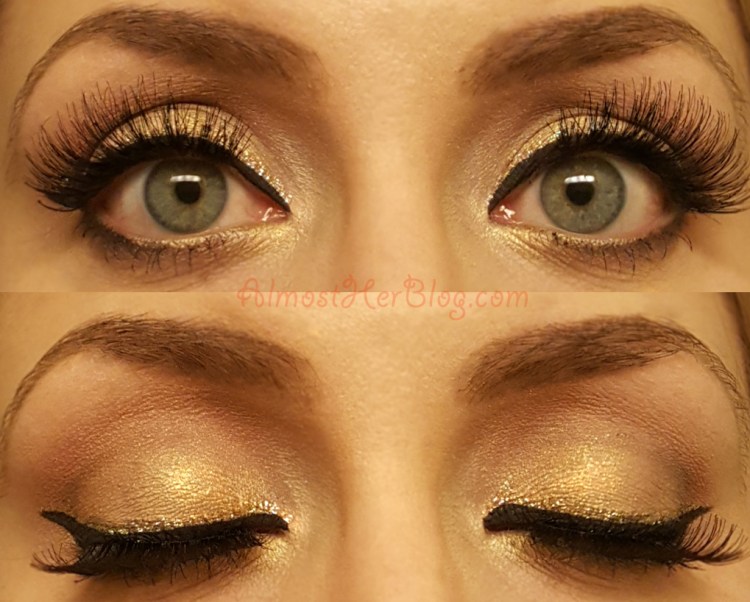
Don’t forget your red lip with this look. It heightens the glam factor! I was so excited to get my hands on this metallic lipstick from ColourPop, which happens to be in their Hello Kitty collection. ( I LOVE Hello Kitty!) You’d be unable to see this unless you had it up close but this lipstick, called “Surprise” is described as a “metallic finish dynamic cool-toned ruby red topped with copper and hot pink glitter.” It is soooooooooo gorgeous and I’m in love!! Here is the completed look:

PRODUCTS USED FOR EYE:
Urban Decay Eyeshadow Primer Potion- Anti-Aging
Urban Decay Naked Smoky palette: Thirteen, Combust, Whiskey, and Dirtysweet
Urban Decay Moondust Eyeshadow in “Scorpio”
NYX Jumbo Eye Pencil in “Milk”
Urban Decay Full Spectrum Palette color in “Goldmine”
Almay Liquid Liner in Black
NYX Cosmetics Liquid Crystal Liner in “Crystal Champagne”
Urban Decay 24/7 Glide on Eye Pencil in “Goldmine”
Laura Geller Deluxe GlamLASH Dramatic Volumizing Mascara
Ardell Eyelashes Wispies
Duo Dark-tone Eyelash Adhesive
OTHER PRODUCTS USED:
*ColourPop’s Ultra Metallic Lip color “Surprise” from their Hello Kitty line*
Smashbox Photo Finish Primer Water
Tarte Amazonian Clay 12-hour Full Coverage Foundation SPF 15 in Light Neutral
IT Cosmetics “Bye Bye Under Eye” in Neutral Medium
Almay Clear Complexion Concealer in Light
IT Cosmetics Brow Power in Universal
Smashbox LA Lights Blendable Lip & Cheek Color in “Beverly Hills Blush”
Urban Decay Afterglow 8-hour Highlight in “Sin”
LORAC PRO Contour Palette
IT Cosmetics “Bye Bye Pores” Powder

I also want to say a HUGE thank you to the people that liked my last makeup post! I hadn’t done one in while and all of the positivity I received is the reason I have this one today. So THANK you!! And a shout out the ladies that tried the “Nillionaire” look for themselves and told me about it…you seriously made my day!! ❤
I hope that this was helpful and that you enjoyed it!! If there are any makeup looks or things you want to see, please feel free to comment or message me. If you liked this also please feel free to share!! I hope this finds you all well and MERRY CHRISTMAS!!!!!!

